
Fun & Simple Paper Plate Umbrella Craft for Toddlers & Preschoolers
What are the odds you have a little one like mine? You set up a fun painting activity, carefully lay out the paper, brushes, and paint, and within 30 seconds, they’re swirling colors together into one big masterpiece.
What was supposed to be a cute craft for your wall has turned into an exciting color-mixing experiment! Sound familiar?
Instead of tossing out that paint-covered paper plate, why not turn it into a creative umbrella craft? This easy umbrella craft for kids is perfect for toddlers and preschoolers who love to paint, mix colors, and explore textures. Plus, it’s a great way to celebrate spring with a simple recycled paper plate craft!
Setting Up for a Fun and (hopefully) Contained Mess Craft
Painting with little ones can get messy fast, but a little prep goes a long way! Here are a few simple setup tips to make this paper plate umbrella craft stress-free and fun:
- Use a sturdy workspace – Lay down flattened cardboard boxes to cover the table and make cleanup easier.
- Skip the expensive paint palettes – Paper plates work as both a paint palette and the base for your craft! –umbrellas maybe?
- Try non-traditional painting tools – Sponges, shower poufs, forks, or even fingers make for a fun sensory experience.
- Dress for mess – Oversized T-shirts with cut sides make the perfect easy-on, easy-off paint smocks.
- Have wet wipes handy – Quick cleanups keep the fun going without the stress.
Once your space is ready, you’re set to dive into this spring painting activity!

Materials You’ll Need
You don’t need much to create this adorable spring umbrella craft—just a few simple supplies:
- White paper plates (thin, disposable kind)
- Child-safe paint in spring colors
- Paintbrushes or fun painting tools (sponges, shower poufs, forks, etc.)
- Construction paper for the umbrella handle
- Scissors
- Glue stick or tape
Quick tip: skip the brushes. Look around your space and find something new to paint with:
- Shower pouf
- Sponges
- Forks
- Hands
- Potato masher
- Yarn
- Feathers
Why not? Wash what you can, throw what you can’t. I guarantee their interest will be peaked.
How To Make This a Recycled Project
Recently my 3-year-old son has asked to do a project almost daily. Finally!! How exciting!!
Now slow it down a little, ‘do a project’ means give me paint and watch me paint my hands and swirl all the colors. It’s really not as terrifying as it sounds. Sometimes I even get pretty handprint art out of the process.


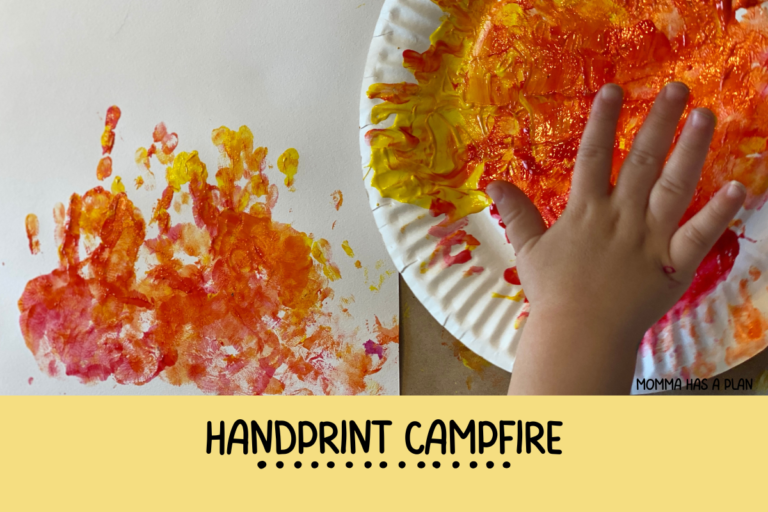
One item I always keep stocked at my home is white paper plates. Those flimsy ones you don’t want to see being used at picnics. They’re terrible for food but amazing for art projects. You can make so much with a simple paper plate. They also make great paint palettes!
Unbeknown to you and your little, you have just supplied at least two projects. If your kiddo has mixed or swirled or spread the paint on their little paper plate palette they have probably created another really interesting work of art. Why throw this away? Turn that process art into a finished project.
After a recent Easter project where we painted with shower poufs and pastel-colored paints, we had some really pretty paper plates left at the end.
The colors are so cheerful and springy, they will make perfect umbrellas for our next display!

How to Make a Paper Plate Umbrella Craft
You don’t have to save this for a recycled paper plate project, this is a great project to put a couple globs of paint down and let your child explore and experiment for a while. Kids are washable.
Step 1: Paint Your Paper Plate
Let your child explore with colors and textures as they paint their plate. Encourage color recognition by asking them what colors they’re using. Try not to guide them too much—this is their creative process!
Step 2: Cut the Umbrella Shape
Once the plate is dry, cut it slightly below the halfway point. You can make a straight cut or go for a wavy edge to give the umbrella a playful look. Don’t throw away the bottom portion—you can use it for another craft later!
Step 3: Create the Handle
Cut out a J-shaped umbrella handle from construction paper. Let your child choose the color for extra fun decision-making practice.
Step 4: Assemble the Umbrella
Glue or tape the handle to the back of the umbrella piece. If your child loves using glue, let them help! It’s a great way to practice fine motor skills.
Step 5: Display Your Spring Art
Once your umbrella is complete, hang it on the fridge, add it to a spring-themed bulletin board, or even create a rainy-day backdrop to go with it!


Learning Through Play – Why This Craft is More Than Just Fun
Crafting is an amazing way for toddlers and preschoolers to learn through play!
- Color Exploration – Encourage kids to name the colors they’re using and notice how colors mix.
- Fine Motor Skills – Cutting, gluing, and painting all help develop hand-eye coordination.
- Imaginative Play – Once dry, use the umbrella craft as part of a rainy-day storytelling activity.
- Sensory Fun – Ask how the paint feels, if using a silly painting utensil talk about it!!
Love Paper Plate Crafts? So Do We!!
If you love the simplicity of a paper plate canvas as much as we do, here are a few more ideas for you to try out!
Easy Paper Plate Rainbow Craft For Toddlers
How To Create A Paper Plate Frog
Bee and Beehive Craft with free template
I’m feeling springy…rainbows, frogs, and bees!!
Takeaway Tips for a Smooth Crafting Experience
- Try not to get frustrated when kids start mixing paint colors instead of doing the planned craft.
- What can you do to adapt?
- Whether you create this paper plate umbrella craft or turn your extra art plates into something else, think outside the box!
- Embrace the mess! It’s all part of the fun—kids are washable!